This DIY hanging herb garden is simple to make and only requires a few tools. It’s perfect for people who want fresh herbs, but don’t want to create a raised garden bed or to have single plants sitting around.
The benefits of having a vertical garden are that you can do it in a limited space and you can do it with minimal material.
Care is also easier and can even be automated if you want to get a little creative with an automatic drip type setup.
Table of Contents
DIY Hanging Herb Garden Materials and Tools
To get started you’ll need a few tools and some materials:
Tools:
Materials:
| (3 – 5) Galvanized planter tubs (20-3/4”L x 11-3/4” W x 7”H) |
| 10 Feet of Stainless steel chain |
| (20) Stainless steel S hooks |
| Ceiling mounts |
| Organic soil 10 – 15 quarts per tin |
| Your choice of herbs |
Steps to create a vertical hanging garden
1. Drill drain holes
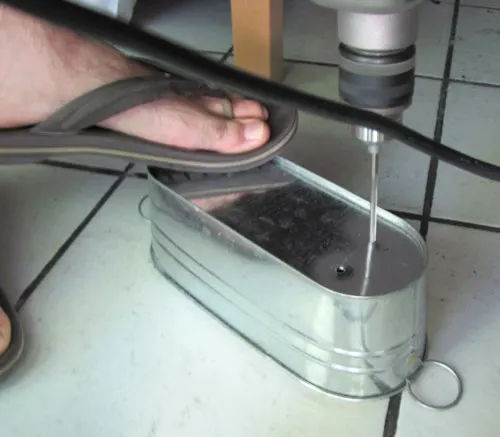

First take your new containers and drill holes in the bottom so that any excess water can drain out of them.
2. Paint old discolored containters (optional)
This step is optional, because if you purchased new bins like the ones listed above, they will be galvanized and will already have protection from moisture.
If however, you are reusing tins you managed to find around the house or at a garage sale, then it is a good idea to paint them.


To paint them you will need to do the following:
- Rough up the surface with a scotch bright pad or a sand paper with 120 grit or higher. You don’t want to gouge the metal. Just make sure any loose debree such as rust is scraped off and the shine parts of the surface are all scuffed up a bit. This allows the material to stick to the surface.
- Next wash the container thouroughly and let it dry completely.
- Once dry you can apply a coat of primer, possibly two depending on the need.
- Once the primer has dried (follow the steps on the can) get out your paint that you have chosen and apply it.
3. Plant the herbs


Next take your herb friendly soil and your herbs and plant them in the containers.
4. Place your mounts

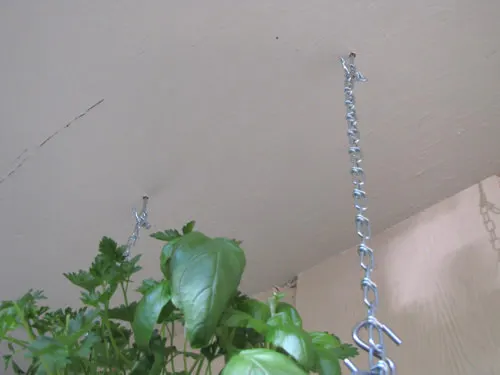
Next you’ll need to have a place to hang the chain off of. Pictured are some screw hooks screwed into the ceiling on the front porch. You’ll need to make sure you are hitting a stud to ensure the weight can be fully supported.
While screw hooks were used in this setup, a more beneficial mount would be some stainless steel pad eye hooks which you can use snap hooks or S hooks to hang the chain with.
5. Cut the chain to size (optional)


If you are buying your chain from your local hardware store you can ask them to cut the chain to your needs. This saves you from needing to buy bolt cutters if you don’t already have some.
If you just have a long piece of chain then you should measure out the length you will need keeping in mind the spacing from the ceiling, beteen the plants, and if you’re planning to mount it on the ground as well.
Once you know your length, just cut it to size. You don’t need to cut it into multiple pieces, unless that’s the look you want. You can just cut two equal length pieces, one for each side.
6. Hang the plants
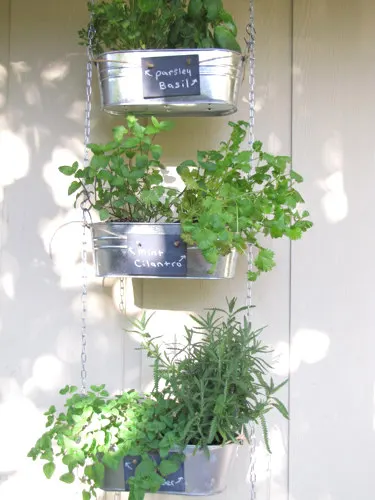

Now that the plants are planted, mounts are set and the chain is cut to size you are ready to hang everything up.
- First hang the chain from your mounts.
- Next place your S hooks at the desired height from the top
- Repeat until all planters are hanging
7. Labelling (optional)

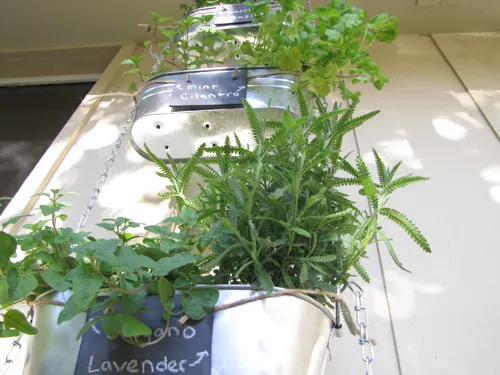
If you bought the recommended bins at the top, then you won’t need to do this since you could already personalize those.
That being said, you can still add this little feature to your vertical garden for a nice creative touch. All you need is to get some small chalk boards and attach them to each container.
Then you can label them whatever you want, or have the kids draw on them.
Common questions
Do herbs grow well in hanging baskets?
Yes, many herbs can grow well in hanging baskets, especially those that do not require a lot of space or soil depth.
What herbs can grow in vertical garden?
Some popular herbs that are good for growing in hanging baskets include:
Thyme, Oregano, Parsley, Mint, Rosemary, and more.
Wrapping up
This DIY hanging herb garden is a pretty simple setup that only required a few things.
By following the steps outlined in this article, you can transform ordinary tin containers into beautiful hanging planters that will add charm and functionality to your home.
With the right selection of herbs and proper care, you’ll be able to enjoy flavorful and aromatic herbs all year round.
Whether you’re a seasoned gardener or a novice, this DIY project is easy to do and can be a fun way to bring a touch of green to your living space.
So why not give it a try and enjoy the benefits of fresh herbs right at your fingertips!