The easiest way to propagate Monstera is to take a stem cutting with at least one node and root it in water, soil, sphagnum moss, perlite, or LECA. A Monstera leaf by itself will not grow into a new plant because new growth comes from nodes and axillary buds on the stem. Water propagation is usually easiest for beginners because you can watch the roots form, but soil, moss, perlite, and air layering can also work well when moisture and airflow are managed carefully.
Success comes down to four things: choose a healthy cutting, include a node, use clean tools, and keep the cutting warm in bright indirect light without letting the node rot. This guide shows where to cut, which propagation method to choose, when to pot your rooted cutting, and how to troubleshoot common Monstera propagation problems.

Quick Monstera Propagation Summary
| Question | Quick answer | Notes |
|---|---|---|
| Best method for beginners | Water propagation | You can see root growth and spot rot early. |
| Best cutting type | Stem cutting with at least one node | A leaf, petiole, or aerial root alone is not enough. |
| Minimum cutting requirement | One healthy node with a growth point | An aerial root is helpful, but the node is the critical part. |
| Can a leaf-only cutting work? | No | A leaf may stay alive for a while, but it will not grow a new Monstera vine without a node. |
| Best time to propagate | Spring through summer | Indoor cuttings can work year-round if kept warm and bright. |
| Rooting timeline | Often 2–8 weeks for roots | New leaves can take longer, especially in low light or winter. |
| When to pot | When roots are a few inches long or have side roots | Do not rush potting if roots are tiny and fragile. |
| Best light | Bright indirect light | Avoid harsh direct sun on fresh cuttings. |
| Biggest failure risk | Rot | Rot usually comes from dirty tools, stagnant water, soggy media, cold conditions, or poor airflow. |
| Best soil after rooting | Chunky, well-draining Monstera mix | Use a small pot with drainage holes. |
What Part of a Monstera Can You Propagate?
To propagate Monstera successfully, you need a piece of stem with at least one node. The node is the swollen or bumpy part of the stem where leaves, aerial roots, and new growth can develop. A cutting with a node can produce roots and eventually a new vine.
A leaf-only cutting is different. If a Monstera leaf breaks off with only its petiole and no node, it may look fresh in water for a while, but it will not become a full new plant. The same is true for an aerial root by itself. Aerial roots can help a cutting establish faster, but they do not replace the node.
Monstera Cutting Anatomy Checklist
| Part | What it is | Can it make a new Monstera? |
|---|---|---|
| Leaf | The green blade that performs photosynthesis | No, not by itself |
| Petiole | The stalk connecting the leaf blade to the stem | No, not by itself |
| Stem | The vine section that holds nodes and internodes | Yes, if it includes a node |
| Node | The growth point area on the stem | Yes, this is required |
| Aerial root | A root growing from the stem above soil | Helpful, but not enough by itself |
| Internode | The stem section between nodes | No, unless the cutting also includes a node |
| Axillary bud | A dormant growth point near the node | Yes, this is where new growth can emerge |
Best Time to Propagate Monstera
The best time to propagate Monstera is spring through early summer, when the plant is actively growing. Cuttings usually root faster when temperatures are warm, light is strong but indirect, and the mother plant is healthy.
You can propagate Monstera indoors at other times of year, but fall and winter cuttings are usually slower. If you propagate during low-light months, keep the cutting warm and consider adding a grow light for a few hours a day.
Avoid propagating from a plant that is already stressed, pest-infested, badly dehydrated, rotting, or recently shocked by repotting. A stronger mother plant usually gives you a stronger cutting.
Tools and Materials You Need
- Clean, sharp pruning shears, scissors, or a knife
- Rubbing alcohol or disinfectant for cleaning blades
- Gloves, especially if your skin is sensitive to Monstera sap
- Glass jar or propagation vessel for water propagation
- Fresh water, preferably room temperature
- Small pot with drainage holes
- Chunky, well-draining Monstera soil mix
- Sphagnum moss, perlite, or LECA if using those methods
- Plant label so you can track the cutting date and method
- Optional rooting hormone
Clean tools matter. A sharp, disinfected cut heals more cleanly and reduces the chance of introducing bacteria or fungus into the stem.
How to Take a Monstera Cutting
The cut matters more than the container. Before you choose water, soil, moss, perlite, or LECA, make sure your cutting includes the right plant parts.
- Choose a healthy vine. Look for firm stems, healthy leaves, and no signs of pests, rot, or disease.
- Find a node. Look for a bump, ring, aerial root, or swollen point where a leaf and petiole meet the stem.
- Decide whether to include an aerial root. It is helpful if one is present, but the node is still the required part.
- Cut below the node. Use clean shears and cut roughly 1–2 inches below the node along the internode.
- Remove any lower leaves if needed. Keep leaves out of water or wet media so they do not rot.
- Choose your rooting method. Water is easiest to monitor; soil, moss, perlite, and LECA can also work.
- Place the cutting in bright indirect light. Avoid harsh direct sun while roots are forming.
- Watch for roots and rot. Healthy roots are usually firm and pale; rotting tissue is soft, dark, slimy, or foul-smelling.
Important: Do not cut random Monstera leaves without nodes and expect them to grow into new plants. A leaf-only cutting is not a true propagation cutting.
Monstera Propagation Methods Compared
| Method | Best for | Pros | Cons | Root visibility | Rot risk | Beginner-friendly? | When to use it |
|---|---|---|---|---|---|---|---|
| Water propagation | Beginners and visual monitoring | Easy to see roots; simple setup | Water roots may need time to adjust to soil | Excellent | Medium if water gets stagnant | Yes | Use when learning or when you want to watch root growth. |
| Soil propagation | Cuttings that will stay in soil | Less transition from water to soil | Harder to see roots forming | Low | Medium to high if soil stays soggy | Moderate | Use when you can manage moisture carefully. |
| Sphagnum moss | Nodes and aerial-root cuttings | Holds moisture while allowing airflow | Can mold or stay too wet if packed tightly | Good in clear containers | Medium | Moderate | Use for small node cuttings or airier rooting conditions. |
| Perlite | Rot-prone cuttings and airy rooting | Excellent oxygen around roots | Needs moisture monitoring | Good in clear containers | Lower when not waterlogged | Moderate | Use when you want more airflow than soil. |
| LECA | Semi-hydro growers and visible root tracking | Reusable, airy, and supportive | Requires cleaning and water-level management | Good in clear vessels | Medium | Moderate | Use if you already grow or propagate in LECA. |
| Air layering | Large, valuable, or risky cuttings | Roots form before the stem is removed | More technical and slower to set up | Partial | Lower if moss is kept moist, not soaked | Advanced beginner | Use on mature plants before taking a large cutting. |
| Division | Pots with multiple individual plants | Instant separate plants | Only works if there are separate rooted stems | Visible during repotting | Low if handled gently | Yes | Use when a nursery pot contains several plants. |
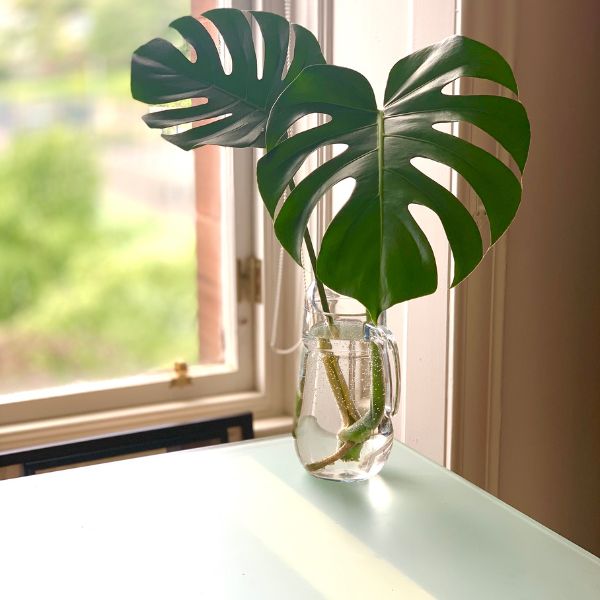
How to Propagate Monstera in Water
Water propagation is the easiest Monstera propagation method for most beginners because you can see exactly what is happening. It is also useful when you are learning the difference between a healthy node, an aerial root, and new roots.
- Take a stem cutting with at least one node.
- Place the node in a clean jar of water. Keep the leaf above the waterline.
- Put the jar in bright indirect light.
- Change the water when it becomes cloudy or starts to smell stale.
- Check the node and roots for rot every few days.
- Move the cutting to soil once it has several healthy roots, ideally a few inches long or starting to branch.
The most common water propagation mistake is submerging too much plant material. Keep leaves and petioles out of the water when possible. The node needs moisture; the whole cutting does not need to be underwater.
How to Propagate Monstera in Soil
Soil propagation skips the water-to-soil transition, but it requires better moisture control because you cannot see the roots forming. Use a small pot with drainage holes and an airy mix, not dense soil that stays wet for days.
- Fill a small pot with a lightly moistened, well-draining Monstera mix.
- Make a hole with your finger or a dibber so the node can sit in the medium without forcing it.
- Place the node in the soil and firm the mix gently around it.
- Keep the medium evenly moist for the first 1–2 weeks, then allow the top layer to dry slightly between waterings.
- Keep the cutting warm and in bright indirect light.
- Check gently for root resistance after a few weeks, but avoid tugging hard on the cutting.
Soil propagation is a good choice if your home is warm and you are confident with watering. If you tend to overwater, water or perlite may be easier to monitor.
How to Propagate Monstera in Sphagnum Moss
Sphagnum moss is useful because it can hold moisture around the node while still allowing air around developing roots. The key is to keep moss damp, not dripping wet.
- Soak the moss, then squeeze out extra water until it feels damp but not soggy.
- Place the Monstera node against the moss.
- Use a clear container or bag with some airflow so you can monitor moisture and roots.
- Open the container periodically to refresh air and check for mold.
- Re-moisten the moss when it begins to dry.
- Move the cutting to soil once roots are strong enough to handle potting.
If the moss smells sour, grows mold, or stays wet for too long, remove the cutting, inspect the node, trim rotted tissue if needed, and restart with fresher, less-wet moss.
How to Propagate Monstera in Perlite
Perlite is a strong option for Monstera cuttings because it supports the cutting while keeping plenty of oxygen around the roots. It is especially helpful if you have had cuttings rot in soggy soil.
- Rinse perlite to reduce dust.
- Add damp perlite to a cup, jar, or nursery pot.
- Place the node into the perlite so it has contact with moisture.
- Keep a small reservoir of water below the node or keep the perlite evenly damp.
- Place in bright indirect light and monitor root growth.
- Transfer to soil when roots are well developed.
Perlite should be moist, but the node should not sit in stagnant water. If roots turn brown and mushy, the container may be too wet or too poorly ventilated.
How to Propagate Monstera in LECA
LECA stands for lightweight expanded clay aggregate. These clay balls hold moisture and create air gaps around developing roots. LECA can be useful for Monstera cuttings, especially if you like semi-hydro growing or want to monitor root growth in a clear vessel.
- Rinse and soak the LECA before use.
- Add a layer of LECA to a clean container.
- Place the Monstera cutting so the node is supported but not buried too deeply.
- Fill around the cutting with more LECA.
- Add water below the node so moisture wicks upward instead of leaving the stem submerged.
- Refresh water as needed and watch for roots.
- Transfer to soil or continue semi-hydro care once roots are established.
LECA is not maintenance-free. Keep the container clean, avoid stale water, and make sure the cutting remains stable while new roots form.
How to Air Layer Monstera
Air layering is a safer method for large, expensive, or mature Monsteras because roots form before you remove the cutting from the mother plant. It takes more setup, but it reduces the risk of cutting off a large piece and losing it before roots form.
- Choose a healthy node on the vine, ideally one with an aerial root or visible growth point.
- Moisten sphagnum moss and squeeze out excess water.
- Wrap the damp moss around the node.
- Cover the moss with clear plastic wrap or a propagation wrap.
- Secure it gently without cutting into the stem.
- Open it occasionally to check moisture and root development.
- Once roots are established, cut below the rooted node and pot it in a well-draining mix.
Keep the moss moist, not soaked. If the moss dries completely, root growth may stall. If it stays wet with no airflow, the stem can rot.
Monstera Propagation Timeline
Propagation timing varies by season, light, temperature, cutting health, and rooting method. Use this as a practical guide, not a guarantee.
| Stage | Typical timing | What to expect | What to do |
|---|---|---|---|
| Day 0 | Cutting day | Fresh stem cutting with a node | Place in water, soil, moss, perlite, LECA, or air-layering setup. |
| Week 1 | Adjustment period | Little visible change | Keep light bright but indirect and watch for rot. |
| Weeks 2–4 | Early rooting | Root bumps or small roots may appear | Keep water fresh or medium evenly damp, not soggy. |
| Weeks 4–8 | Root expansion | Roots lengthen and may start branching | Prepare a small pot and chunky Monstera soil mix. |
| Roots a few inches long | Potting window | Cutting is ready to transition | Pot into a small container with drainage holes. |
| First 2–4 weeks after potting | Transition | Possible mild wilting or pause in growth | Keep conditions stable and avoid overwatering. |
| New leaf growth | Establishment | New stem or leaf begins to emerge | Gradually move into normal Monstera care. |
Roots often appear before new leaves. Do not assume a cutting has failed just because it has not pushed a new leaf yet. If the node is firm and the roots are healthy, keep going.
When to Pot a Monstera Cutting
Pot a Monstera cutting when it has several healthy roots that are a few inches long or when the roots have started to branch. If you are propagating in soil, perlite, moss, or LECA, pot or up-pot when roots are firm and the cutting can support itself.
Use a small pot with drainage holes. Do not move a small cutting into a large pot, because extra soil can stay wet for too long and raise the risk of root rot. A pot only slightly larger than the root system is easier to manage.
After potting, water lightly and let excess water drain. Keep the plant in bright indirect light and avoid fertilizing until the cutting has adjusted and shows signs of active growth.
Best Soil for a Rooted Monstera Cutting
A newly rooted Monstera cutting needs an airy, well-draining mix. Dense soil holds too much moisture around young roots, which can lead to rot.
A simple Monstera mix can include potting mix plus chunky amendments such as orchid bark, perlite, pumice, or coco coir. The goal is a mix that holds some moisture but still drains quickly and leaves air pockets around the roots.
For a deeper mix breakdown, see HerbVity’s guide to the best soil for Monstera plants.
Monstera Propagation Troubleshooting
| Problem | Likely cause | What to do | Prevention |
|---|---|---|---|
| Cutting has no roots | Low light, cold room, weak cutting, or not enough time | Keep warm, increase bright indirect light, and wait if the node is firm | Propagate in spring/summer and use healthy cuttings |
| Stem is mushy | Rot from too much moisture or dirty tools | Cut away rot if possible and restart with a clean node | Use clean tools and keep media moist, not soggy |
| Node is black | Advanced rot | If the node is soft and black, the cutting may not be salvageable | Monitor early and avoid stagnant water |
| Water smells bad | Stagnant water or decaying tissue | Replace water, rinse the jar, and inspect the cutting | Change water when cloudy and keep leaves out of water |
| Leaf turns yellow | Stress, low light, old leaf, or rot beginning | Check the node and roots first; improve light and stability | Use a strong cutting with at least one healthy leaf |
| Leaf wilts | Water stress, transplant shock, or weak roots | Keep conditions stable and avoid moving the cutting repeatedly | Wait for stronger roots before potting |
| Roots are brown or slimy | Root rot or poor oxygen | Trim slimy roots and restart in fresh water or airy medium | Use drainage and avoid waterlogged media |
| Mold on moss | Moss too wet or too little airflow | Open the container, replace moldy moss, and reduce moisture | Use damp, not soaked, moss and add ventilation |
| No new growth after potting | Roots are still establishing | Wait if the plant is firm and roots are healthy | Do not expect new leaves immediately after potting |
| Cutting has aerial root but no new roots | Aerial root is not enough without active node growth | Confirm a node is present and keep conditions warm and bright | Take cuttings with a node and growth point |
| Cutting was taken without a node | Leaf-only or petiole-only cutting | Use it as a temporary display, but take a new node cutting for propagation | Identify the node before cutting |
| Algae in water | Clear container in bright light | Clean jar and refresh water | Change water regularly and keep out of direct sun |
| Cutting rots after potting | Overpotting, dense soil, or overwatering | Remove, inspect roots, trim rot, and repot smaller if salvageable | Use a small pot and chunky soil mix |
If yellowing leaves are happening on the mother plant too, read HerbVity’s guide to yellow Monstera leaves. If the issue seems related to watering, see how to water a Monstera.
Common Monstera Propagation Mistakes
- Cutting without a node: This is the most common reason a cutting never becomes a new plant.
- Mistaking aerial roots for nodes: Aerial roots are helpful, but the node is the growth point.
- Using dirty scissors: Dirty tools can introduce rot and disease.
- Keeping the node too wet: Moisture helps roots form, but soggy conditions cause rot.
- Letting moss stay soaked: Sphagnum should be damp and airy, not dripping wet.
- Putting cuttings in harsh direct sun: Fresh cuttings can scorch or dehydrate.
- Potting too early: Tiny roots are fragile and may struggle in soil.
- Using too large a pot: Too much soil holds too much water.
- Using dense soil: Monstera roots need air as well as moisture.
- Changing too many conditions at once: Move slowly when transitioning from water to soil.
- Ignoring pests on the mother plant: A pest-infested cutting usually starts at a disadvantage.
- Expecting a new leaf before roots are established: Root growth comes first.
Monstera Cutting Aftercare
After potting a rooted Monstera cutting, keep conditions steady. A fresh cutting does not need intense fertilizer, constant repotting, or direct sun. It needs time to adjust.
- Light: Bright indirect light is best. For placement details, see Monstera light needs.
- Water: Keep the mix lightly moist at first, then let the top layer dry slightly between waterings.
- Humidity: Moderate humidity helps reduce stress, especially in dry homes.
- Pot size: Use a small pot with drainage holes.
- Fertilizer: Wait until the cutting has settled and shows active growth before feeding.
- Support: Add a stake or small pole if the cutting is top-heavy.
- Pruning: Once established, pruning can help shape the plant. Read how to prune Monstera plants for more detail.
Can You Propagate Other Monstera Types the Same Way?
Most vining Monstera types and Monstera-like aroids are propagated with node-bearing stem cuttings. The exact growth speed and cutting size can vary, but the same rule still applies: look for a node, not just a leaf.
Monstera deliciosa is the classic Swiss cheese plant and the main focus of this guide. Monstera adansonii can also be propagated from node cuttings, though its stems and leaves are smaller. Variegated Monstera cuttings should be chosen carefully because the cutting needs both a healthy node and enough green tissue to support growth.
Monstera minima is commonly called “mini Monstera,” but it is usually Rhaphidophora tetrasperma, not a true Monstera. If that is the plant you have, start with HerbVity’s Monstera minima care guide. If you are unsure whether your plant is a Monstera or a split-leaf philodendron, see split-leaf philodendron vs Monstera deliciosa.
Pet Safety Note
Keep Monstera cuttings, propagation jars, and freshly potted plants away from cats and dogs. Propagation setups can be especially tempting because the leaves sit at table height, jars are easy to tip over, and water can attract curious pets.
For more detail, read HerbVity’s guides on whether Monstera plants are toxic to cats and whether Monsteras are toxic to dogs.
Video
This video is useful for visualizing where to cut and how water propagation looks, but it belongs below the core instructions so readers get the node requirement first.
Related HerbVity Guides
- Best soil for Monstera plants
- How to water a Monstera
- How to prune Monstera plants
- Yellow Monstera leaves
- Monstera light needs
- How to care for Monstera aerial roots
- Are Monstera plants toxic to cats?
- Are Monsteras toxic to dogs?
- Monstera minima care
- Split-leaf philodendron vs Monstera deliciosa
- Gardening soil vs potting soil
- Fertilizer vs plant food
FAQs About Monstera Propagation
Can you propagate Monstera without a node?
No. A Monstera cutting needs a node to produce new growth. A leaf, petiole, or aerial root without a node may stay alive temporarily, but it will not become a new Monstera vine.
Can you propagate Monstera from a leaf?
No, not from a leaf alone. The leaf can look attractive in water for a while, but a new plant needs a piece of stem with a node and growth point.
Where do you cut Monstera for propagation?
Cut 1 to 2 inches below a node using clean, sharp shears. The node should be included on the cutting because that is where new roots and new growth can develop.
Is it better to propagate Monstera in water or soil?
Water is easier for beginners because roots are visible. Soil can reduce the water-to-soil transition, but it is harder to monitor roots and easier to overwater if the mix is too dense.
How long does Monstera take to root?
Many Monstera cuttings begin rooting within a few weeks, but timing varies by season, light, warmth, cutting health, and method. New leaves often take longer than roots.
How long should Monstera roots be before potting?
Pot the cutting when it has several healthy roots that are a few inches long or beginning to branch. Very short roots are fragile and may struggle during the transition to soil.
Can you propagate Monstera with an aerial root?
An aerial root can help a Monstera cutting establish, but it is not enough by itself. The cutting still needs a node on the stem.
Why is my Monstera cutting not rooting?
The cutting may need more time, warmer conditions, brighter indirect light, or better humidity. If the node is firm and healthy, keep waiting. If the node is soft, black, or slimy, rot may be the problem.
Why is my Monstera cutting turning yellow?
Yellowing can come from stress, low light, an aging leaf, overwatering, or rot. Check the node and roots first; if they are firm and healthy, stabilize light, warmth, and moisture.
Why is my Monstera cutting rotting?
Rot usually happens when the cutting sits in stagnant water, soggy moss, dense soil, cold conditions, or a dirty container. Remove rotted tissue if possible and restart in clean water or a fresh airy medium.
Should I use rooting hormone for Monstera?
Rooting hormone is optional. Monstera can root without it, but it may help some cuttings root more quickly or more densely when used correctly on the node.
What soil should I use for a rooted Monstera cutting?
Use a chunky, well-draining Monstera or aroid-style mix in a small pot with drainage holes. Avoid dense, soggy soil because young roots are vulnerable to rot.
Final Thoughts
The most important Monstera propagation rule is simple: include a node. Once you have a healthy node cutting, you can root it in water, soil, sphagnum moss, perlite, LECA, or by air layering. Water is the easiest method to monitor, while airier media can help reduce transition shock when moisture is controlled carefully.
Keep the cutting warm, bright, and out of direct sun. Watch for firm pale roots, avoid soggy conditions, and pot the cutting into a small container with chunky Monstera soil once the roots are strong enough. With patience and the right cut, one Monstera can become several healthy plants.